
|
ZGameEditor Documentation
Community |
Main /
Tutorial3Tutorial 3: The OneButton-gameIn this tutorial we will make a very simple game: OneButton. This is a game where a single button is used for control. It is best if you have read the first two tutorials before starting this one. Here is a picture illustrating the gameplay: 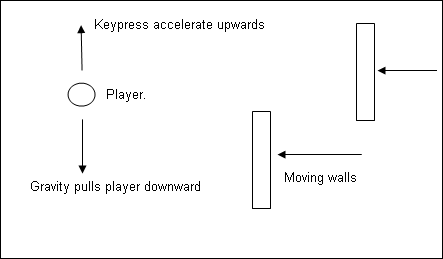 First we will create the main active components in our game: Player and Walls. In ZGameEditor a moving graphical entity and its behaviour is called a Model. So we need a PlayerModel and a WallModel. Creating the Player modelStart with defining the player model.
A model needs 3D-geometry for it to display itself. This is called a Mesh. The first component we create is the PlayerMesh.
Now expand the PlayerMesh tree node to expose the Producers list property. This is a list of component that is used to generate (or produce) the mesh.
If you click on the PlayerMesh-node you will see that we now have created a small diamond shaped mesh. 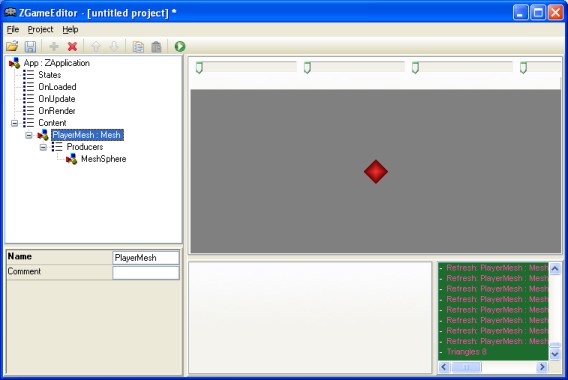 In this game we want to use flat-shaded geometry. So the next component we need is a Material.
And create another material that we will use later on in this tutorial: the TextMaterial.
Now we are ready to create the model representing the player.
Notice that CollisionBounds have four edit fields, but we only set the first two. This is because the default collision style in ZGameEditor is 2D rectangular collision. The first value is width and the second is height. Next we will control how the PlayerModel will be rendered on screen.
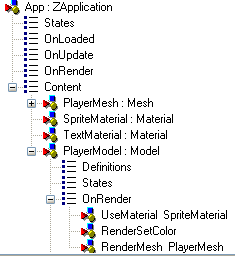
We will use the same material for both the player and walls. In order to display them in different color we use a RenderSetColor component.
Now we can render the mesh.
 That's it for displaying the player-model. Now let's add some logic for how the player will move. This is done in the OnUpdate component list of the model.
The KeyPress component tests for user input. Comment property is used for typing comments that will help remembering how the application works without looking at all the property values. Keys property is set to which input to test, in this case we test for Arrow-Up (represented by special character "^") key and left mouse button click ("{").
So what did we just do? When the user clicks the mouse or press the arrow Up-key, the ZExpression will be executed. The expression adds a value to the Y (vertical) velocity. This makes the model accelerate upwards. Next some movement logic and constraints to the player model:
CurrentModel.Velocity.Y-=5.5*App.DeltaTime;
CurrentModel.Velocity.Y=clamp(CurrentModel.Velocity.Y,-6,5);

if(CurrentModel.Position.Y<-4) {
  CurrentModel.Position.Y=-4;
  CurrentModel.Velocity.Y=0;
}

if(CurrentModel.Position.Y>4) {
  CurrentModel.Position.Y=4;
  CurrentModel.Velocity.Y=0;
}

CurrentModel.Rotation.X+=0.25 * App.DeltaTime;
This is what the expression does:
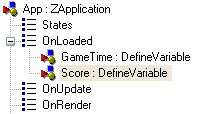
Delta-time explainedWhy the multiply with App.DeltaTime? This is to make sure your game works in the same speed independent of the frame update interval. Imagine a very slow computer that is only able to display 10 frames per second. OnUpdate is called between each frame. DeltaTime is set to the time-difference between last frame. So on the slow computer this will be 1/10 = 0.1 seconds. After one second of game time, velocity will be 0.1 * 10 frames = 1.0. On the other hand, a fast computer may display 100 frames per second. Then DeltaTime becomes 1/100 = 0.01 seconds. So after one seconds we have velocity 0.01 * 100 = which is again 1.0. Thanks to multiplying with DeltaTime we have the same effect on both the slow and the fast computer after one second. Without DeltaTime, velocity would be 10 times higher on the faster computer. That would make the game too slow and boring on the slow computer, and too fast and impossible to play on the fast computer! So that is why DeltaTime is important to use! Defining game variablesVariables are components that are used in expressions for holding values that are important for the application. In our game, we will have two such values to keep track of:
Here is how you create the variables:
 Creating the Wall modelNext is the Wall model. Walls are the obstacles that the player have to dodge. We create the wall in the same way we created the player. Start with the geometry.
Click the WallMesh component for preview. The wall is a vertical standing box. 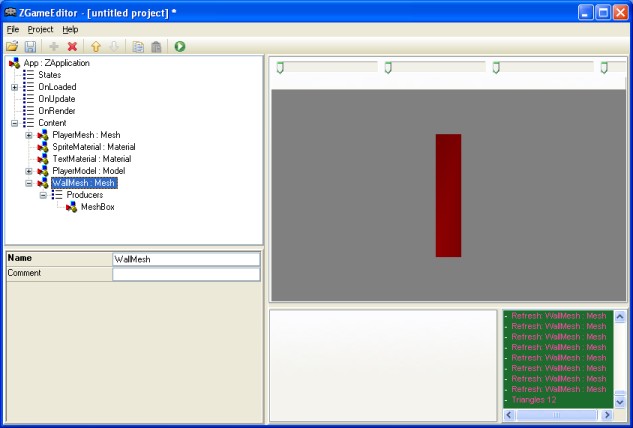 Continue to create the Model for the wall.
Category and CollisionBounds are used for collision detection. Render the wall:
Use a orange color for the walls:
Render wall geometry:
Now for the Update-logic for the wall. The wall will move to the left. We need to check if the wall have reached outside the screen and if that is the case remove it.
The expression will return true when the models X (horizontal) position is lower than -7.5. The default camera in ZGameEditor have origo in the center of the screen with X rising from a negative value in the far left, to a positive value in the far right of the screen. In this case -7.5 is a position outside the left edge of the screen, including some extra space to make sure no part of the wall is visible when it is removed.
We want to initiate every wall with some unique property values on creation. A Model instance is created when the SpawnModel-component is executed. The first thing a newly spawned model do is running the commands in the OnSpawn-list property.
CurrentModel.Position.X=8;
CurrentModel.Position.Y=random(0,4);
CurrentModel.Velocity.X=-3 - clamp(GameTime*0.1,0,2.5);
The expression does the following:
This is how the finished wall model should look like on your screen: 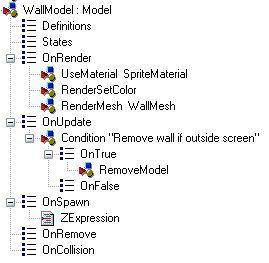 Ok, we have our created our player and wall objects. Let's move on to define the application logic. Application statesAn application state is a part of your application that has a distinct behaviour, such as waiting for a keypress or displaying a message. Only one state can be active at once. This is called the current application state. Some examples of typical states for a game application:
In our game we will have two different application states:
The ZGameEditor component that defines a application state is called AppState. Note: It is not required to use AppState-components. Simple applications may not need them at all, and different application behaviour can be achieved with using Condition-components in OnUpdate and OnRender. But using AppStates can make your project cleaner and require less effort when you want to make changes. First we create the PlayingState.
Now define what will happen when when the player wants to start a new game. This is done in PlayingState.OnStart.
This will spawn the player model at the X=-2 position, a bit left of center. Next for some variable initialization.
GameTime=0;
Score=0;
The expression do just what it looks like: set the GameTime and Score variable to zero when the game starts. AppState.OnUpdate is called once between every frame update, just like Model.OnUpdate. On our PlayingState we will add logic to spawn new walls and update the GameTime variable.
The expression just increase our gametime variable with the amount of time that has elapsed since last frame update.
The Timer -component executes the OnTimer list on a set interval, in this case 1 second.
Score+=100;
WallTimer.Interval=1.5 - clamp(GameTime*0.02,0,1);
The first line of expression increase the score with 100. The second line sets a new interval for the next time the OnTimer list will be executed. The interval is decreased with GameTime to make walls appear faster over time. 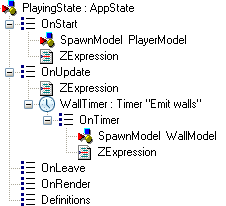 The PlayerState is now finished. Let's move on and define TitleState.
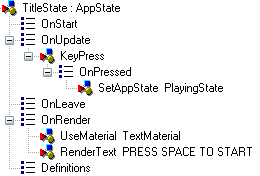
Now for the update-behaviour. When the user press space on the keyboard, the game will begin.
OnRender on title state will display a message.
 Time to save the project if you haven't already done so. Select File - Save Project from the main menu. Name the project "OneButton". Note: There is no Undo-functionality in ZGameEditor, so it is a good idea to save your work often! (but since version 1.9.6 you can "Undo delete" if you accidentally remove a component) We need to tell ZGameEditor that the initial application state is the TitleState.
Collision detection and score-displayAlmost done now. Three more things are needed:
First the collision:
Then the score-display. We render the text from App.OnRender instead of PlayingState.OnRender because we want the score to be displayed in both state. That way, the last score will be visible on title screen.
The TextFloatRef property allows the value of a property on another component to be displayed as text. Now for the definition of behaviour when the player collides with a wall. Clear screen of all models and return to the title screen:
The finished gameThat's it! First save your project again, and then try pressing F9 to start the game. 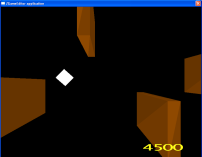 The finished tutorial source file can be downloaded here: OneButton.zip. The final version also have some simple sound effects added. Some suggestions for improvements:
|